 Andy De George
c0ba284473
Andy De George
c0ba284473
* Merge winforms framework content to working branch (#14)

* Breadcrumb / TOC / Move net5 to net folder (#15)

* change path from net5 to net

* Mess with bread/toc

* Mess with bread/toc

* Mess with bread/toc

* Mess with bread/toc

* Mess with bread/toc

* Mess with bread/toc

* Mess with bread/toc

* Mess with bread/toc

* Mess with bread/toc

* Mess with bread/toc

* Mess with bread/toc

* Mess with bread/toc

* Mess with bread/toc

* Mess with bread/toc

* Add .net 5 winforms placeholder article (#16)

* added some metadata and adjusted net5 placeholder

* corrections

* corrections

* corrections

* Test1

* Swapping landing page vs concept

* fix links

* Fix links

* Fix desc
15 KiB
title, ms.date, helpviewer_keywords, dev_langs, ms.assetid
| title | ms.date | helpviewer_keywords | dev_langs | ms.assetid | |||||
|---|---|---|---|---|---|---|---|---|---|
| Walkthrough: Creating an Accessible Windows-based Application | 03/30/2017 |
|
|
654c7f2f-1586-480b-9f12-9d9b8f5cc32b |
Walkthrough: Creating an Accessible Windows-based Application
Creating an accessible application has important business implications. Many governments have accessibility regulations for software purchase. The Certified for Windows logo includes accessibility requirements. An estimated 30 million residents of the U.S. alone, many of them potential customers, are affected by the accessibility of software.
This walkthrough will address the five accessibility requirements for the Certified for Windows logo. According to these requirements, an accessible application will:
-
Support Control Panel size, color, font, and input settings. The menu bar, title bar, borders, and status bar will all resize themselves when the user changes the control panel settings. No additional changes to the controls or code are required in this application.
-
Support High Contrast mode.
-
Provide documented keyboard access to all features.
-
Expose location of the keyboard focus visually and programmatically.
-
Avoid conveying important information by sound alone.
For more information, see Resources for Designing Accessible Applications.
For information on supporting varying keyboard layouts, see Best Practices for Developing World-Ready Applications.
Creating the Project
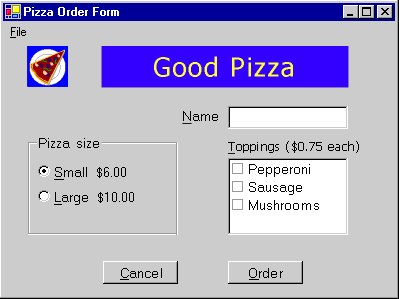
This walkthrough creates the user interface for an application that takes pizza orders. It consists of a xref:System.Windows.Forms.TextBox for the customer's name, a xref:System.Windows.Forms.RadioButton group to select the pizza size, a xref:System.Windows.Forms.CheckedListBox for selecting the toppings, two Button controls labeled Order and Cancel, and a Menu with an Exit command.
The user enters the customer's name, the size of the pizza, and the toppings desired. When the user clicks the Order button, a summary of the order and its cost are displayed in a message box and the controls are cleared and ready for the next order. When the user clicks the Cancel button, the controls are cleared and ready for the next order. When the user clicks the Exit menu item, the program closes.
The emphasis of this walkthrough is not the code for a retail order system, but the accessibility of the user interface. The walkthrough demonstrates the accessibility features of several frequently used controls, including buttons, radio buttons, text boxes, and labels.
To begin making the application
- Create a new Windows Application in Visual Basic or Visual C#. Name the project PizzaOrder. For details, see Creating New Solutions and Projects.
Adding the Controls to the Form
When adding the controls to a form, keep in mind the following guidelines to make an accessible application:
-
Set the xref:System.Windows.Forms.Control.AccessibleDescription%2A and xref:System.Windows.Forms.Control.AccessibleName%2A properties. In this example, the Default setting for the xref:System.Windows.Forms.Control.AccessibleRole%2A is sufficient. For more information on the accessibility properties, see Providing Accessibility Information for Controls on a Windows Form.
-
Set the font size to 10 points or larger.
Note
If you set the font size of the form to 10 when you start, then all controls subsequently added to the form will have a font size of 10.
-
Make sure any Label control that describes a TextBox control immediately precedes the TextBox control in the tab order.
-
Add an access key, using the "&" character, to the xref:System.Windows.Forms.Control.Text%2A property of any control the user may want to navigate to.
-
Add an access key, using the "&" character, to the xref:System.Windows.Forms.Control.Text%2A property of the label that precedes a control that the user may want to navigate to. Set the labels' xref:System.Windows.Forms.Label.UseMnemonic%2A property to
true, so that the focus is set to the next control in the tab order when the user presses the access key. -
Add access keys to all menu items.
To make your Windows Application accessible
-
Add the controls to the form and set the properties as described below. See the picture at the end of the table for a model of how to arrange the controls on the form.
Object Property Value Form1 AccessibleDescription Order form AccessibleName Order form Font Size 10 Text Pizza Order Form PictureBox Name logo AccessibleDescription A slice of pizza AccessibleName Company logo Image Any icon or bitmap Label Name companyLabel Text Good Pizza TabIndex 1 AccessibleDescription Company name AccessibleName Company name Backcolor Blue Forecolor Yellow Font size 18 Label Name customerLabel Text &Name TabIndex 2 AccessibleDescription Customer name label AccessibleName Customer name label UseMnemonic True TextBox Name customerName Text (none) TabIndex 3 AccessibleDescription Customer name AccessibleName Customer name GroupBox Name sizeOptions AccessibleDescription Pizza size options AccessibleName Pizza size options Text Pizza size TabIndex 4 RadioButton Name smallPizza Text &Small $6.00 Checked True TabIndex 0 AccessibleDescription Small pizza AccessibleName Small pizza RadioButton Name largePizza Text &Large $10.00 TabIndex 1 AccessibleDescription Large pizza AccessibleName Large pizza Label Name toppingsLabel Text &Toppings ($0.75 each) TabIndex 5 AccessibleDescription Toppings label AccessibleName Toppings label UseMnemonic True CheckedListBox Name toppings TabIndex 6 AccessibleDescription Available toppings AccessibleName Available toppings Items Pepperoni, Sausage, Mushrooms Button Name order Text &Order TabIndex 7 AccessibleDescription Total the order AccessibleName Total order Button Name cancel Text &Cancel TabIndex 8 AccessibleDescription Cancel the order AccessibleName Cancel order MainMenu Name theMainMenu MenuItem Name fileCommands Text &File MenuItem Name exitApp Text E&xit Your form will look something like the following image:

Supporting High Contrast Mode
High Contrast mode is a Windows system setting that improves readability by using contrasting colors and font sizes that are beneficial for visually impaired users. The xref:System.Windows.Forms.SystemInformation.HighContrast%2A property is provided to determine whether the High Contrast mode is set.
If SystemInformation.HighContrast is true, the application should:
-
Display all user interface elements using the system color scheme
-
Convey by visual cues or sound any information that is conveyed through color. For example, if particular list items are highlighted by using a red font, you could also add bold to the font, so that the user has a non-color cue that the items are highlighted.
-
Omit any images or patterns behind text
The application should check the setting of xref:System.Windows.Forms.SystemInformation.HighContrast%2A when the application starts and respond to the system event xref:Microsoft.Win32.SystemEvents.UserPreferenceChanged. The xref:Microsoft.Win32.SystemEvents.UserPreferenceChanged event is raised whenever the value of xref:System.Windows.Forms.SystemInformation.HighContrast%2A changes.
In our application, the only element that is not using the system settings for color is lblCompanyName. The xref:System.Drawing.SystemColors class is used to change the color settings of the label to the user-selected system colors.
To enable High Contrast mode in an effective way
-
Create a method to set the colors of the label to the system colors.
Private Sub SetColorScheme()
    If SystemInformation.HighContrast Then
        companyLabel.BackColor = SystemColors.Window
        companyLabel.ForeColor = SystemColors.WindowText
    Else
        companyLabel.BackColor = Color.Blue
        companyLabel.ForeColor = Color.Yellow
    End If
End Sub
private void SetColorScheme() { if (SystemInformation.HighContrast) { companyLabel.BackColor = SystemColors.Window; companyLabel.ForeColor = SystemColors.WindowText; } else { companyLabel.BackColor = Color.Blue; companyLabel.ForeColor = Color.Yellow; } } -
Call the
SetColorSchemeprocedure in the form constructor (Public Sub New()in Visual Basic andpublic Form1()in Visual C#). To access the constructor in Visual Basic, you will need to expand the region labeled Windows Form Designer generated code.Public Sub New() MyBase.New() InitializeComponent() SetColorScheme() End Subpublic Form1() { InitializeComponent(); SetColorScheme(); } -
Create an event procedure, with the appropriate signature, to respond to the xref:Microsoft.Win32.SystemEvents.UserPreferenceChanged event.
Protected Sub UserPreferenceChanged(sender As Object, _
e As Microsoft.Win32.UserPreferenceChangedEventArgs)
    SetColorScheme()
End Sub
public void UserPreferenceChanged(object sender, Microsoft.Win32.UserPreferenceChangedEventArgs e) { SetColorScheme(); } -
Add code to the form constructor, after the call to
InitializeComponents, to hook up the event procedure to the system event. This method calls theSetColorSchemeprocedure.Public Sub New() MyBase.New() InitializeComponent() SetColorScheme() AddHandler Microsoft.Win32.SystemEvents.UserPreferenceChanged, _ AddressOf Me.UserPreferenceChanged End Subpublic Form1() { InitializeComponent(); SetColorScheme(); Microsoft.Win32.SystemEvents.UserPreferenceChanged += new Microsoft.Win32.UserPreferenceChangedEventHandler( this.UserPreferenceChanged); } -
Add code to the form xref:System.Windows.Forms.Control.Dispose%2A method, before the call to the xref:System.Windows.Forms.Control.Dispose%2A method of the base class, to release the event when the application closes. To access the xref:System.Windows.Forms.Control.Dispose%2A method in Visual Basic, you will need to expand the region labeled Windows Form Designer generated code.
Note
The system event code runs a thread separate from the main application. If you do not release the event, the code that you hook up to the event will run even after the program is closed.
Protected Overloads Overrides Sub Dispose(ByVal disposing As Boolean)
    If disposing AndAlso components IsNot Nothing Then
        components.Dispose()
    End If
    RemoveHandler Microsoft.Win32.SystemEvents.UserPreferenceChanged, _
       AddressOf Me.UserPreferenceChanged
    MyBase.Dispose(disposing)
End Sub
protected override void Dispose(bool disposing) { if(disposing && components != null) { components.Dispose(); } Microsoft.Win32.SystemEvents.UserPreferenceChanged -= new Microsoft.Win32.UserPreferenceChangedEventHandler( this.UserPreferenceChanged); base.Dispose( disposing ); } -
Press F5 to run the application.
Conveying Important Information by Means Other Than Sound
In this application, no information is conveyed by sound alone. If you use sound in your application, then you should supply the information by some other means as well.
To supply information by some other means than sound
-
Make the title bar flash by using the Windows API function FlashWindow. For an example of how to call Windows API functions, see Walkthrough: Calling Windows APIs.
Note
The user may have the Windows SoundSentry service enabled, which will also cause the window to flash when the system sounds are played through the computer's built-in speaker.
-
Display the important information in a non-modal window so that the user may respond to it.
-
Display a message box that acquires the keyboard focus. Avoid this method when the user may be typing.
-
Display a status indicator in the status notification area of the taskbar. For details, see Adding Application Icons to the TaskBar with the Windows Forms NotifyIcon Component.
Testing the Application
Before deploying the application, you should test the accessibility features that you have implemented.
To test accessibility features
-
To test keyboard access, unplug the mouse and navigate the user interface for each feature using only the keyboard. Ensure that all tasks may be performed using the keyboard only.
-
To test support of High Contrast, choose the Accessibility Options icon in Control Panel. Click the Display tab and select the Use High Contrast check box. Navigate through all user interface elements to ensure that the color and font changes are reflected. Also, ensure that images or patterns drawn behind text are omitted.
Note
Windows NT 4 does not have an Accessibility Options icon in Control Panel. Thus, this procedure for changing the SystemInformation.HighContrast setting does not work in Windows NT 4.
-
Other tools are readily available for testing the accessibility of an application.
-
To test exposing the keyboard focus, run Magnifier. (To open it, click the Start menu, point to Programs, point to Accessories, point to Accessibility, and then click Magnifier). Navigate the user interface using both keyboard tabbing and the mouse. Ensure that all navigation is tracked properly in Magnifier.
-
To test exposing screen elements, run Inspect, and use both the mouse and the TAB key to reach each element. Ensure that the information presented in the Name, State, Role, Location, and Value fields of the Inspect window is meaningful to the user for each object in the UI.