---
title: Create InkCanvas in Visual Studio
ms.date: 08/15/2018
dev_langs:
- "csharp"
- "vb"
helpviewer_keywords:
- "procedural code in lieu of XAML [WPF]"
- "XAML [WPF], procedural code in lieu of"
- "InkCanvas (WPF)"
ms.assetid: 760332dd-594a-475d-865b-01659db8cab7
---
# Get Started with Ink in WPF
Windows Presentation Foundation (WPF) has an ink feature that makes it easy to incorporate digital ink into your app.
## Prerequisites
To use the following examples, first install [Visual Studio](https://visualstudio.microsoft.com/downloads/?utm_medium=microsoft&utm_source=docs.microsoft.com&utm_campaign=inline+link&utm_content=download+vs2019). It also helps to know how to write basic WPF apps. For help getting started with WPF, see [Walkthrough: My first WPF desktop application](../getting-started/walkthrough-my-first-wpf-desktop-application.md).
## Quick Start
This section helps you write a simple WPF application that collects ink.
### Got Ink?
To create a WPF app that supports ink:
1. Open Visual Studio.
2. Create a new **WPF App**.
In the **New Project** dialog, expand the **Installed** > **Visual C#** or **Visual Basic** > **Windows Desktop** category. Then, select the **WPF App (.NET Framework)** app template. Enter a name, and then select **OK**.
Visual Studio creates the project, and *MainWindow.xaml* opens in the designer.
3. Type `` between the `` tags.
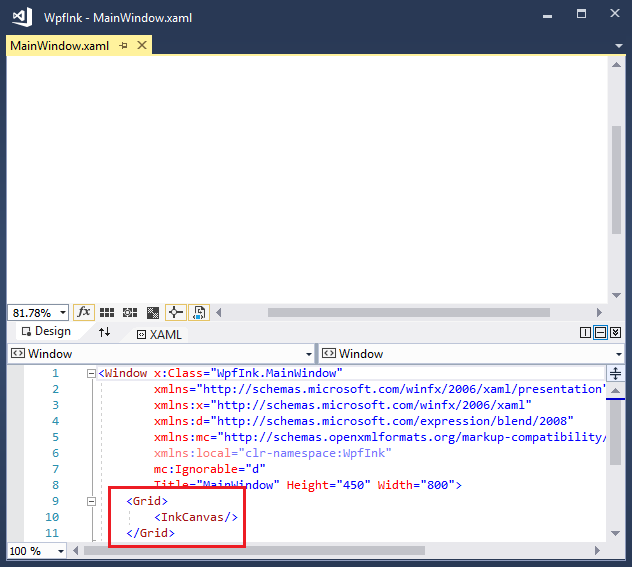
4. Press **F5** to launch your application in the debugger.
5. Using a stylus or mouse, write **hello world** in the window.
You've written the ink equivalent of a "hello world" application with only 12 keystrokes!
### Spice Up Your App
Let’s take advantage of some features of the WPF. Replace everything between the opening and closing \ tags with the following markup:
```xaml
```
This XAML creates a gradient brush background on your inking surface.

### Add Some Code Behind the XAML
While XAML makes it very easy to design the user interface, any real-world application needs to add code to handle events. Here is a simple example that zooms in on the ink in response to a right-click from a mouse.
1. Set the `MouseRightButtonUp` handler in your XAML:
[!code-xaml[DigitalInkTopics#3](~/samples/snippets/csharp/VS_Snippets_Wpf/DigitalInkTopics/CSharp/Window2.xaml#3)]
1. In **Solution Explorer**, expand MainWindow.xaml and open the code-behind file (MainWindow.xaml.cs or MainWindow.xaml.vb). Add the following event handler code:
[!code-csharp[DigitalInkTopics#4](~/samples/snippets/csharp/VS_Snippets_Wpf/DigitalInkTopics/CSharp/Window2.xaml.cs#4)]
[!code-vb[DigitalInkTopics#4](~/samples/snippets/visualbasic/VS_Snippets_Wpf/DigitalInkTopics/VisualBasic/Window2.xaml.vb#4)]
1. Run the application. Add some ink, and then right-click with the mouse or perform a press-and-hold equivalent with a stylus.
The display zooms in each time you click with the right mouse button.
### Use Procedural Code Instead of XAML
You can access all WPF features from procedural code. Follow these steps to create a "Hello Ink World" application for WPF that doesn’t use any XAML at all.
1. Create a new console application project in Visual Studio.
In the **New Project** dialog, expand the **Installed** > **Visual C#** or **Visual Basic** > **Windows Desktop** category. Then, select the **Console App (.NET Framework)** app template. Enter a name, and then select **OK**.
1. Paste the following code into the Program.cs or Program.vb file:
[!code-csharp[InkCanvasConsoleApp#1](~/samples/snippets/csharp/VS_Snippets_Wpf/InkCanvasConsoleApp/CSharp/Program.cs#1)]
[!code-vb[InkCanvasConsoleApp#1](~/samples/snippets/visualbasic/VS_Snippets_Wpf/InkCanvasConsoleApp/VisualBasic/Module1.vb#1)]
1. Add references to the PresentationCore, PresentationFramework, and WindowsBase assemblies by right-clicking on **References** in **Solution Explorer** and choosing **Add Reference**.

1. Build the application by pressing **F5**.
## See also
- [Digital Ink](digital-ink.md)
- [Collecting Ink](collecting-ink.md)
- [Handwriting Recognition](handwriting-recognition.md)
- [Storing Ink](storing-ink.md)